17 June 2010

Task 59 - 24-hour Data-logging to EEPROM; Fritzing breadboard


The Fritzing breadboard is very similar to the 3 earlier tasks, but with the addition of a push-button switch which is to delay output of results until required.

The push-button is tied to Ground at one end, &
at the other to Digital Pin 12, which is set (pinMode) as an INPUT, & is initialised to HIGH.
When the switch is closed, pin 12 dips towards Ground, is no longer HIGH, & the software enables other tasks to be carried out - namely, the outputting of data in a suitable form.
The software for this has been modularised using Functions, so it can be tested,
& other Functions added as appropriate..


Task 58 - Data-logging to EEPROM; software & Serial Monitor

Note that part of the code in red.
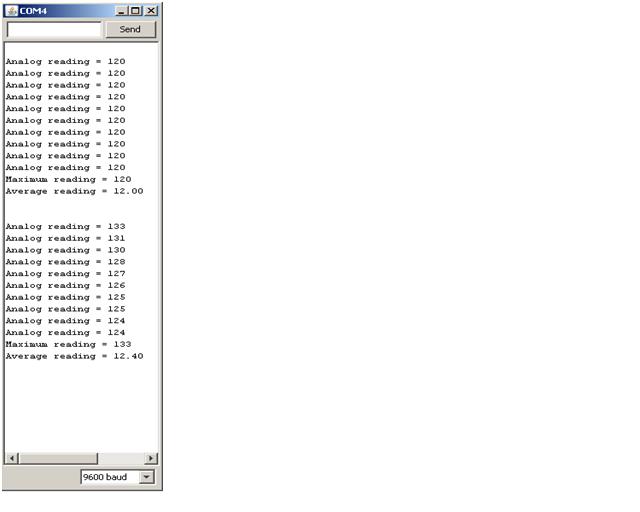
That produced the results on the top left - even when i warmed up the thermistor it still gave those results.
Where the line

delay(5):


is now corrected the problem, as can be seen in the lower left results..
/*
* Project: DataLogging_Thermistor_task_58
* Author: Jane-Maree Howard
* Date: Thursday 17/06/2010
* Platform: Arduino 18
* Purpose: To data-log 10 successive readings from a thermistor
at 1-second intervals, saving the readings into EEPROM,
& after a 5-second delay, to output results to the SM
along with the biggest value recorded, & the average
(Mean) of the recorded values.
* Operation: The average resistance of the thermistor is about 10 kOhms,
so it & the 10k resistor form a voltage divider, whose
junction is inputted to Analog 0.
* Description:
* Connect one end of the thermistor to 5V, the other end to Analog 0.
Then connect one end of a 10K resistor from Analog 0 to ground
this is quite similar to the photocell Task, but the software is
a little different.
* Comment: One thing I FORGOT was scaling; I don't know what the thermistor
range is but on past results I'd say more than 0-255.
Rather than mess about with Hi-Lo bytes,
better put in the Mapping Function
Also, this time I didn't bother with the array - seems unnecessary(?)

NOTE: this blogger doesn't like 'less-than' signs - it thinks they're HTML thingies..
so where you see n"10 put n 'less-than' 10
,
& where you see n""10 put n 'greater-than' 10.

VERY IMPORTANT!!
In the coding below there is a
#include EEPROM.h
statement.
Around the EEPROM.h there should be 'less-than' &
'greater-than' symbols.
these don't show up in these blog postings..
..AND - they disappear anything inside them as well, so..
..don't forget them!
*/

#include EEPROM.h // needed for using EEPROM

byte thermistorPin = 0; // the thermistor and 10K pulldown are connected to a0
int thermistorReading; // temporarilly holds unscaled thermistor readings

byte readCount = 10; // this counts the readings to allow halting..
byte maximValue = 0; // to be the minimum stored EEPROM value
float meanValue; // the average (Mean) of the EEPROM values

/* Everything is done here in the Setup() because we don't want to loop */
void setup(void)
{
// We'll send debugging information via the Serial monitor
Serial.begin(9600); // baud rate 9600 should be set on the SM
Serial.println(); // skip a line to start with

/* First read the 10 values into mySamples[] .. */
for (byte n=0; n"readCount; n++)
{
// read value on thermistor pin i.e. analog 0
thermistorReading = analogRead(thermistorPin);
// now we have to map 0-1023 to 0-255,
// since we want to store the values as bytes, in EEPROM
EEPROM.write(n, map(thermistorReading, 0, 1023, 0, 255));
delay(1000); //wait 1 second
// delay 5 milli-seconds for EEPROM.read lag
//delay(5);
}//for(n)

/* Now wait 5 seconds.. */
delay(5000);

/* ..then print them from EEPROM to the SM. */
fromEEPROM(readCount);

/* Finally, print the minimum value to the SM.. */
Serial.print("Maximum reading = ");
Serial.println(biggestFromEEPROM(maximValue, readCount));
/* ..& the average (Mean) */
Serial.print("Average reading = ");
Serial.println(averageFromEEPROM(meanValue, readCount));
Serial.println();

}//end setup()

void loop(void) //EMPTY LOOP
{}//end loop()


/* Reads a given number of values from EEPROM
& prints them to the Serial Monitor
*/
void fromEEPROM(byte rCount)
{
for (byte n=0; n"rCount; n++)
{
// print the analog reading to the SM
Serial.print("Analog reading = ");
Serial.println(EEPROM.read(n));
delay(5);
}//for()
}//fromEEPROM()

/* Reads a given number of values from EEPROM,
determines the minimum value, & returns it. */
byte biggestFromEEPROM(byte maxVal, byte rCount)
{
byte temp;
for (byte n=0; n"rCount; n++)
{
temp = EEPROM.read(n);
// delay 5 milli-seconds for EEPROM.read lag
delay(5);
if (temp "" maxVal)
{
maxVal = temp;
}//if()
return maxVal;
}//for()
}//biggestFromEEPROM()

/* Reads a given number of values from EEPROM,
determines the Mean value, & returns it. */
float averageFromEEPROM(float meanVal, byte rCount)
{
byte temp = 0;
for (byte n=0; n"rCount; n++)
{
//sum the EEPROM values &..
temp = EEPROM.read(n);
// ..delay 5 milli-seconds for EEPROM.read lag..
delay(5);
}//for()
//..& return the Mean value
return meanVal = temp/rCount;
}//averageFromEEPROM()


Task 57 - Data-logging to EEPROM; software & Serial Monitor

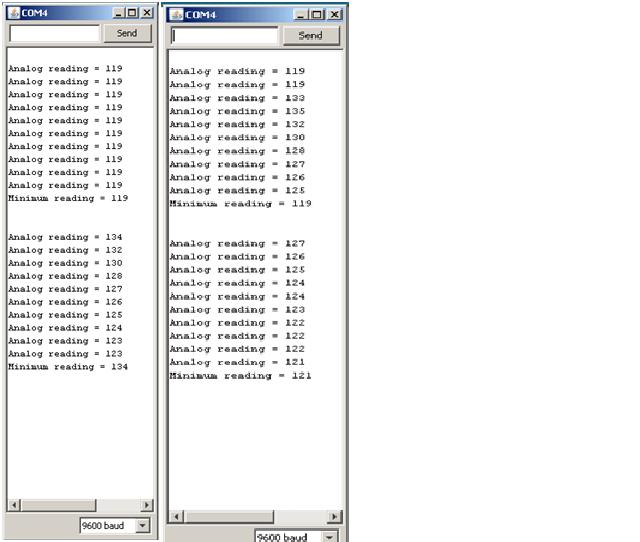
The Serial Monitor image on the left shows that i had screwed up somehow.. the code in redshows what i did wrong..
/*
* Project: DataLogging_Thermistor_task_57
* Author: Jane-Maree Howard
* Date: Thursday 17/06/2010
* Platform: Arduino 18
* Purpose: To data-log 10 successive readings from a thermistor
at 1-second intervals, saving the readings into EEPROM,
& after a 5-second delay, to output results to the SM
along with the smallest value recorded.
* Operation: The average resistance of the thermistor is about 10 kOhms,
so it & the 10k resistor form a voltage divider, whose
junction is inputted to Analog 0.
* Description:
* Connect one end of the thermistor to 5V, the other end to Analog 0.
Then connect one end of a 10K resistor from Analog 0 to ground
this is quite similar to the photocell Task, but the software is
a little different.
* Comment: One thing I FORGOT was scaling; I don't know what the thermistor
range is but on past results I'd say more than 0-255.
Rather than mess about with Hi-Lo bytes,
better put in the Mapping Function
Also, this time I didn't bother with the array - seems unnecessary(?)

NOTE: this blogger doesn't like 'less-than' signs - it thinks they're HTML thingies..
so where you see n"10 put n 'less-than' 10


VERY IMPORTANT!!
In the coding below there is a
#include EEPROM.h
statement.
Around the EEPROM.h there should be 'less-than' &
'greater-than' symbols.
these don't show up in these blog postings..
..AND - they disappear anything inside them as well, so..
..don't forget them!
*/
#include EEPROM.h // needed for using EEPROM

byte thermistorPin = 0; // the thermistor and 10K pulldown are connected to a0
int thermistorReading; // temporarilly holds unscaled thermistor readings

byte readCount = 10; // this counts the readings to allow halting..
byte minimValue = 255; // to be the minimum stored EEPROM value

void setup(void)
{
// We'll send debugging information via the Serial monitor
Serial.begin(9600); // baud rate 9600 should be set on the SM
Serial.println(); // skip a line to start with

/* First read the 10 values into EEPROM .. */
for (byte n=0; n"readCount; n++)
{
// read value on thermistor pin i.e. analog 0
thermistorReading = analogRead(thermistorPin);
/* now we have to map 0-1023 to 0-255,
since we want to store the values as bytes, in EEPROM */
EEPROM.write(n, map(thermistorReading, 0, 1023, 0, 255));
// delay 5 milli-seconds
//delay(5);
// delay 1 second
delay(1000);
}//for(n)

/* Now delay 5 seconds.. */
delay(5000);

/* ..then print them from EEPROM to the SM. */
fromEEPROM(readCount);

/* Finally, print the minimum value to the SM */
Serial.print("Minimum reading = ");
Serial.println(smallestFromEEPROM(minimValue, readCount));
Serial.println();

}//end setup()


void loop(void) //empty loop
{}//end loop()


/* Reads a given number of values from EEPROM
& prints them to the Serial Monitor
*/
void fromEEPROM(byte rCount)
{
for (byte n=0; n"rCount; n++)
{
// print the analog reading to the SM
Serial.print("Analog reading = ");
Serial.println(EEPROM.read(n));
// delay 5 milli-seconds for EEPROM.read lag
delay(5);
}//for()
}//fromEEPROM()


/* Reads a given number of values from EEPROM,
determines the minimum value, & returns it.
*/
byte smallestFromEEPROM(byte minVal, byte rCount)
{
byte temp;
for (byte n=0; n"rCount; n++)
{
temp = EEPROM.read(n);
// delay 5 milli-seconds for EEPROM.read lag
delay(5);
if (temp " minVal)
{
minVal = temp;
}//if()
//return minVal;
}//for()
return minVal;
}//smallestFromEEPROM()


15 June 2010

Arduino EEPROM extension EXROM


Hey, I just found an extension to

Arduino's EEPROM library on YABB

Check this out

It's called EXROM


Arduino KEYWORDS(6)

Wire.begin()

Wire.begin(address)

Initiate the Wire library
and join the I2C bus as a master or slave.

Parameters:

address: the 7-bit slave address (optional);

if not specified, join the bus as a master.


Wire.requestFrom(address, quantity)

Request bytes from another device.
The bytes may then be retrieved with the
available()
and receive() functions.

Parameters:

address: the 7-bit address of the device to request bytes from

quantity: the number of bytes to request


Wire.available()

Returns the number of bytes available
for retrieval with receive().
This should be called on a master device
after a call to requestFrom()
or on a slave inside the onReceive() handler.

No parameters

Returns:
The number of bytes available for reading.


byte Wire.receive()

Retrieve a byte that was transmitted
from a slave device to a master
after a call to requestFrom
or was transmitted from a master to a slave.

No parameters

Returns:
The next byte received.


Wire.onReceive(handler)

Registers a function to be called
when a slave device receives a transmission
from a master.

Parameters:

handler: the function to be called when the slave receives data;


this should take a single int parameter
(the number of bytes received from the master)
and return nothing,
e.g.: void myHandler(int numBytes)

No return

Wire.beginTransmission(address)

Begin a transmission to the I2C slave device with the given address.
Subsequently, queue bytes for transmission with the send() function
and transmit them by calling endTransmission().

Parameters:

address: the 7-bit address of the device to transmit to

No return


Wire.send(value)

Wire.send(string)

Wire.send(data, quantity)

Sends data from a slave device
in response to a request from a master,
or queues bytes for transmission
from a master to slave device
(in-between calls to beginTransmission()
and endTransmission()).

Parameters:

value: a byte to send (byte)

string: a string to send (char *)

data: an array of data to send (byte *)

quantity: the number of bytes of data to transmit (byte)

No return


Wire.endTransmission()

Ends a transmission to a slave device
that was begun by beginTransmission()
and actually transmits the bytes
that were queued by send().

No parameters
No returns


Wire.onRequest(handler)

Register a function to be called
when a master requests data
from this slave device.

Parameters:

handler: the function to be called,
takes no parameters and returns nothing,
e.g.: void myHandler()

No return

Arduino i2c Wire.h library

Wire Library

This library allows you to communicate with I2C / TWI devices.
On most Arduino boards,
SDA (data line) is on analog input pin 4, and
SCL (clock line) is on analog input pin 5.
On the Arduino Mega, SDA is digital pin 20 and SCL is 21.

Functions

Note

There are both 7- and 8-bit versions of I2C addresses.
7 bits identify the device, and the eighth bit determines
if it's being written to or read from.
The Wire library uses 7 bit addresses throughout.
If you have a datasheet or sample code that uses 8 bit address,
you'll want to drop the low bit (i.e. shift the value one bit to the right),
yielding an address between 0 and 127.


Arduino KEYWORDS(5)

EEPROM Clear

/*Sets all of the bytes of the EEPROM to 0.*/

#include [EEPROM.h]
/*these should be Less-than & Greater-than brackets
but Blogger thinks they're HTML :-( */

void setup()
{
// write a 0 to all 512 bytes of the EEPROM
for (int i = 0; i [ 512; i++)
EEPROM.write(i, 0);

// turn the LED on when we're done
digitalWrite(13, HIGH);
}//end setup()

void loop()
{}//end empty looop


EEPROM Write

/* Stores values read from analog input 0 into the EEPROM.
These values will stay in the EEPROM when the board is turned off
and may be retrieved later by another sketch. */

#include [EEPROM.h] //see note above
/* the current address in the EEPROM
(i.e. which byte we're going to write to next) */
int addr = 0;

void setup() { } //end empty setup()

void loop()
{
/* need to divide by 4 because analog inputs range
from 0 to 1023 and each byte of the EEPROM
can only hold a value from 0 to 255. */
int val = analogRead(0) / 4;

/* write the value to the appropriate byte of the EEPROM.
These values will remain there when the board is turned off. */
EEPROM.write(addr, val);

/* advance to the next address.
There are 512 bytes in the EEPROM,
so go back to 0 when we hit 512. */
addr = addr + 1;
if (addr == 512) addr = 0;
delay(100);
}//end loop()

EEPROM Read

/*Reads the value of each byte of the EEPROM
and prints it to the computer.*/

#include [EEPROM.h]

// start reading from the first byte (address 0) of the EEPROM
int address = 0;
byte value;

void setup()
{
Serial.begin(9600);
}//end setup()

void loop()
{
// read a byte from the current address of the EEPROM
value = EEPROM.read(address);

Serial.print(address);
Serial.print("\t");
Serial.print(value, DEC);
Serial.println();

// advance to the next address of the EEPROM
address = address + 1;

/* there are only 512 bytes of EEPROM, from 0 to 511, so if we're
on address 512, wrap around to address 0 */
if (address == 512)
address = 0;

delay(500);
}//end loop()


Task 60 - The ATmega328 parts


EEPROM - Electrically Erasable Programable Read Only Memory
Non-volatile store for data, which stays there after power-off


SRAM - Static Random Access Memory
Volatile store for program variables, which disappears on power-off

Flash - Non-volatile memory for uploading & storing programs, which stay there on power-off, & until replaced by another uploaded program

TWI - Two Wire Interface
Used for serial data transfer to & from external memory. So-named because it needs only two communication lines: a Clock line (SCL on the Arduino) & a Data line (SDA), apart from +Vcc & Ground (-Vcc). Commonly used with protocols like I2C (Interconnected Integrated Circuits).

A/D Conv - Analog/Digital Converter
Since all processing, storage etc in the ATmega328 is done digitally, the Analog inputs must be 'digitised', & that's done by this block

SPI

USART - Universal Serial Asychronous Receive Transmit

13 June 2010

Task 56 - Data-logging to EEPROM; software & Serial Monitor

I wondered why i wasgetting all those 'x's you can see in the Serial Monitor image on the left - hadn't converted to 'int's, had i..!!
The errors are in red

/*
* Project: DataLogging_Thermistor_task_56
* Author: Jane-Maree Howard
* Date: Sunday 13/06/2010
* Platform: Arduino 18
* Purpose: To data-log 10 successive readings from a thermistor
at 1-second intervals, save the readings into an array
called mySamples[], save the array values into EEPROM,
& output results to the SM after a 5-second delay.
* Operation: The average resistance of the thermistor is about 10 kOhms,
so it & the 10k resistor form a voltage divider, whose
junction is inputted to Analog 0.
* Description:
* Connect one end of the thermistor to 5V, the other end to Analog 0.
Then connect one end of a 10K resistor from Analog 0 to ground
this is quite similar to the photocell Task, but the software is
a little different.
* Comment: One thing I FORGOT was scaling; I don't know what the thermistor
range is but on past results I'd say more than 0-255.
Rather than mess about with Hi-Lo bytes,
better put in the Mapping Function

NOTE: this blogger doesn't like 'less-than' signs - it thinks they're HTML thingies..
so where you see n"10 put n 'less-than' 10


VERY IMPORTANT!!
In the coding below there is a
#include EEPROM.h
statement.
Around the EEPROM.h there should be 'less-than' &
'greater-than' symbols.
these don't show up in these blog postings..
..AND - they disappear anything inside them as well, so..
..don't forget them!

*/
#include EEPROM.h // needed for using EEPROM

byte thermistorPin = 0; // the thermistor and 10K pulldown are connected to a0
int thermistorReading; // temporarilly holds unscaled thermistor readings
byte mySamples[10]; // holds the mapped analog readings from the sensor divider
byte readCount = 10; // this counts the readings to allow halting..

void setup(void)
{
// We'll send debugging information via the Serial monitor
Serial.begin(9600); // baud rate 9600 should be set on the SM
Serial.println(); // skip a line to start with

/* First read the 10 values into mySamples[] .. */
for (byte n=0; n"readCount; n++)
{
// read value on thermistor pin i.e. analog 0
thermistorReading = analogRead(thermistorPin);
// now we have to map 0-1023 to 0-255,
// since we want to store the values as bytes, in EEPROM
mySamples[n] = map(thermistorReading, 0, 1023, 0, 255);
// delay 1 second
delay(1000);
}//for(n)

/* ..then store them in EEPROM. */
for (byte n=0; n"readCount; n++)
{
EEPROM.write(n, mySamples[n]);
// delay 5 milli-seconds for EEPROM.write lag
delay(5);
}//for(n)

/* Now delay 5 seconds.. */
delay(5000);

/* ..then print them from EEPROM to the SM. */
for (byte n=0; n'readCount; n++)
{
// print the analog reading to the SM
Serial.print("Analog reading = ");
//Serial.println(EEPROM.read(n));
Serial.println(int(EEPROM.read(n)));
// delay 5 milli-seconds for EEPROM.read lag
delay(5);
}//for()

}//end setup()

void loop(void) //empty loop
{}//end loop()

Task 55 - Datalogging to an Array: Serial Monitor, software

The usual output: room temperature & my rather warmer fingers for the second (reset) group of values..
..had to re-arrange the software a bit, as the Comments in the software mention..


/*
* Project: DataLogging_Thermistor_task_55_v2
* Author: Jane-Maree Howard
* Date: Sunday 13/06/2010

* Platform: Arduino 18

* Purpose: To data-log 10 successive readings from a thermistor at 1-second intervals, save the readings into an array called mySamples[] & output results to the SM after the last reading.
* Operation: The average resistance of the thermistor is about 10 kOhms,
so it & the 10k resistor form a voltage divider, whose junction is inputted to Analog 0.
* Description:

* Connect one end of the thermistor to 5V, the other end to Analog 0.

Then connect one end of a 10K resistor from Analog 0 to ground.
This is quite similar to the photocell Task, but the software is a little different.
* Comment: I tried messing about with Functions - then after several abortive
attempts, decided to stick to the KISS priciple..


NOTE: this blogger doesn't like 'less-than' signs - it thinks they're HTML
thingies.. so where you see n"10 put n 'less-than' 10
(sigh)
*/


int thermistorPin = 0;
// the thermistor and 10K pulldown are connected to a0

int mySamples[10];
// this array will hold the analog readings from the sensor divider

byte readCount = 10;
// this counts the readings to allow halting..


void setup(void)

{

// We'll send debugging information via the Serial monitor

Serial.begin(9600); // baud rate 9600 should be set on the SM

Serial.println(); // skip a line to start with

//first read in the 10 values..
for (byte n=0; n
'' 10; n++)
{
// read value on thermistor pin i.e. analog 0

mySamples[n] = analogRead(thermistorPin);

// delay 1 second

delay(1000);

}//for(n)


//..then print them to the SM
for (byte n=0; n
''10; n++)
{
// print the analog reading to the SM
Serial.print("Analog reading = ");

Serial.println(mySamples[n]);
}//for()

}//end setup()


void loop(void) //empty loop
{}//end loop()